A ducted system is the biggest HVAC investment most NZ homeowners make - and the installation itself is the part people have the most questions about. How long does it take? What needs to happen before the installers show up? Will they need to cut holes in the ceiling? This guide walks through every stage of a ducted installation so you know exactly what's coming - whether it's a new build or a retrofit into an existing Waikato home.
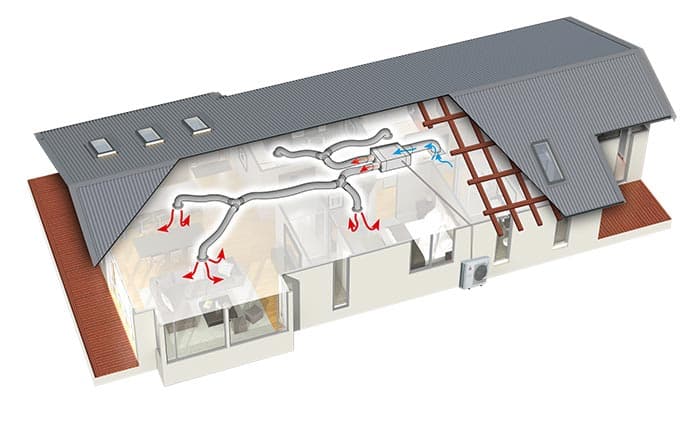
Before the install: the pre-installation process
A ducted system install doesn't start on the day the truck arrives. The most important decisions happen weeks earlier during the planning phase. Getting this right is the difference between a system that runs efficiently for 15+ years and one that struggles from day one.
The site visit
Every ducted installation starts with a site visit. For new builds, this means reviewing the architectural plans with the builder and homeowner. For retrofits, it means physically inspecting the property - climbing into the ceiling cavity, measuring clearances, checking structural framing, and identifying potential obstacles.
During the site visit, the installer is looking at:
- Ceiling cavity depth - the indoor unit and ductwork need adequate clearance. Minimum is typically around 270mm for compact models like the Mitsubishi Electric PEA Splittable Series
- Structural framing - timber noggins, trusses, and bracing dictate where ducts can and cannot run
- Existing insulation - underfloor and ceiling insulation affects heat load calculations and may need to be moved during the install
- Electrical capacity- the home's switchboard needs to support the additional load, and a dedicated circuit is required
- Outdoor unit location - where the condenser can sit with adequate airflow and minimal noise impact on neighbours
Heat load calculation and system sizing
This is the technical step that separates a professional install from a guess. The installer calculates the heating and cooling load for each zone based on floor area, ceiling height, window size and orientation, insulation levels, and local climate data. In the Waikato, homes face cold, damp winters and warm summers - both matter for sizing.
Oversizing wastes money upfront and causes short-cycling (the system turns on and off too frequently, reducing efficiency and increasing wear). Undersizing means the system can't keep up on the coldest mornings. Neither is acceptable.
Duct layout design
With the heat load calculated, the installer designs the duct layout - where each duct run goes, what diameter is needed for each zone, where supply grilles sit in each room, and where the return air grille goes. Good duct design balances airflow across all zones so no room gets too much or too little.
Key design decisions at this stage:
- Supply grille positions - typically ceiling-mounted, placed to distribute air evenly without blowing directly onto seating areas or beds
- Return air location - usually a central hallway position. Poor return air placement is a common cause of system noise
- Duct runs - the shortest, straightest path between the indoor unit and each grille. Every bend and length of duct adds resistance and reduces efficiency
- Zone configuration - which rooms share a zone, which get independent control
Zone planning
Zones are how a ducted system delivers different temperatures to different parts of the home. A typical Waikato family home might have 3-4 zones: living areas as one zone, master bedroom as its own, and children's bedrooms grouped together. Each zone has motorised dampers in the ductwork that open and close to direct airflow where it's needed.
Zone planning is where you decide how you actually want to use the system day to day. Heating the living areas during the evening while keeping bedrooms cool for sleeping. Warming bedrooms in the morning while the living room stays off. The more zones you have, the more control you get - but each additional zone adds cost, so there's a practical balance to find.
The installation process: step by step
Once the design is signed off and equipment is ordered (lead times vary, but allow 1-3 weeks for delivery), installation day arrives. Here's what happens in order.
Step 1 - Indoor unit placement
The indoor unit (also called the air handler or fan coil) is positioned in the ceiling cavity. This is the heart of the system - it contains the evaporator coil and fan that push conditioned air through the ductwork. Placement is critical: it needs to be accessible for future servicing, central enough to keep duct runs short, and positioned where it won't transmit vibration or noise into the rooms below.
For the Mitsubishi Electric PEA Splittable Series, the indoor unit splits into two halves for installation - which is a significant advantage in retrofit situations where ceiling access hatches are small. Rather than cutting a large hole in the ceiling to fit the unit through, each half goes up separately and is joined in the cavity.
Step 2 - Duct runs
Flexible insulated ductwork is run from the indoor unit to each supply grille location. The ducts are secured to ceiling framing, properly supported to prevent sagging, and sealed at every connection point. Leaky duct joints are one of the most common causes of poor system performance - air that escapes into the ceiling cavity is wasted energy.
If the system has zone control, motorised dampers are installed within the ductwork at this stage. Each damper is wired back to the zone controller.
Step 3 - Grille positioning and cutting
Supply grilles are cut into the ceiling at the pre-planned locations. In a new build, the positions are marked before the ceiling goes up - the plasterer leaves the cutouts open. In a retrofit, the installer cuts into the existing ceiling, which means careful measurement and clean cuts.
Grille selection matters more than most people realise. The grille type affects noise, airflow direction, and aesthetics. Linear grilles give a cleaner modern look. Standard rectangular grilles are more common and cost-effective. The return air grille is usually larger than the supply grilles and positioned centrally - often in a hallway.
Step 4 - Outdoor unit installation
The outdoor condenser unit sits on a concrete pad or anti-vibration mounts outside the home. It needs adequate clearance for airflow around the coils and should be positioned away from bedroom windows where possible. In the Waikato, we also consider prevailing wind direction - a unit exposed to strong westerlies may ice up more frequently in winter.
Refrigerant piping connects the outdoor unit to the indoor unit through an exterior wall penetration. The pipe run is insulated, clipped neatly to the building, and the wall penetration is sealed to prevent water ingress.
Step 5 - Refrigerant and electrical
Refrigerant lines are connected, pressure-tested for leaks, and vacuumed to remove moisture and air before the system is charged. This is a licensed task - only qualified refrigeration technicians handle refrigerant work in New Zealand.
Electrical work includes a dedicated circuit from the switchboard to the outdoor unit, wiring between indoor and outdoor units, and connection of the zone controller and thermostat. All electrical work is done by a registered electrician and must comply with AS/NZS 3000 wiring standards.
Step 6 - Commissioning
Commissioning is the final and most important step. The installer powers up the system and runs through a full check:
- Airflow is measured at each grille to confirm balanced distribution across all zones
- Each zone is tested independently - dampers open and close correctly, temperature sensors respond
- Refrigerant pressures and temperatures are checked against manufacturer specifications
- The controller is programmed with your preferred schedules and zone settings
- The system is run in heating and cooling modes to confirm both work correctly
- The homeowner gets a walkthrough of the controls, filter access, and basic maintenance
A properly commissioned system should deliver even temperatures across all zones with minimal noise. If any grille is noticeably louder than others or any room isn't reaching temperature, the installer adjusts damper positions and airflow settings before signing off.
Installation timeline: new build vs retrofit
New build installation
In a new build, the ducted system installation is coordinated with the builder and happens in stages:
- Pre-wire and rough-in (during framing) - electrical cable, control wiring, and refrigerant pipe runs are installed before the walls and ceiling are lined. This takes 1 day
- Ductwork installation (before ceiling lining) - all ducts are run, secured, and sealed while the ceiling cavity is fully accessible. This takes 1-2 days
- Fit-off and commissioning (after interior is complete) - grilles are fitted, the indoor and outdoor units are connected, and the system is commissioned. This takes 1 day
Total time on site: 3-4 days spread across the build timeline. Because the work happens in stages with full access, new build installs are faster, cleaner, and typically $2,000-$4,000 cheaper than equivalent retrofits.
Retrofit installation
Retrofitting a ducted system into an existing home is more involved. The installers are working within an enclosed ceiling cavity, navigating existing framing, insulation, and sometimes plumbing or electrical runs that weren't on any plan.
- Day 1 - ceiling access holes are cut, the indoor unit is lifted into the cavity, and duct runs begin
- Day 2-3 - remaining duct runs, grille cutouts, outdoor unit placement, refrigerant piping, and electrical work
- Day 3-4 - connections, commissioning, ceiling patch-up, and homeowner handover
- Day 5 (if needed) - complex homes with multiple stories, tight cavities, or extensive duct runs may need an extra day
Total time on site: 3-5 days consecutively. Expect some ceiling dust, noise from cutting and drilling, and the outdoor unit installation involves work outside the home. Most families stay in the house during the install.
What homeowners need to prepare
A bit of preparation before the install day makes everything run smoother and faster:
- Clear the ceiling access - if the access hatch is in a wardrobe or hallway cupboard, empty it out. The installers need to get in and out of the ceiling cavity repeatedly
- Move furniture away from grille locations - once final grille positions are confirmed, shift furniture, beds, and shelving away from those ceiling areas to give installers room to work below
- Clear the outdoor unit area - the spot where the condenser will sit needs to be accessible. Move garden furniture, plants, or stored items away from the wall
- Cover belongings - ceiling work creates dust. Cover furniture, beds, and electronics in the rooms where grilles are being cut
- Arrange parking- the install team typically arrives with a van and sometimes a separate vehicle for the outdoor unit. Make sure there's space to park and unload close to the house
- Talk to your neighbours - there will be noise from drilling and cutting, and the outdoor unit installation involves some concrete work. A quick heads-up is good practice
For new builds, the builder handles most of this coordination. The homeowner's main job is confirming grille positions and zone preferences before the ceiling goes in - because changing your mind after lining is expensive.
Common installation challenges
Not every home is straightforward. Here are the most common challenges we encounter across Waikato homes and how they're handled.
Low ceiling cavities
Many older NZ homes - particularly 1960s-1980s builds - have shallow ceiling cavities that make fitting a standard indoor unit difficult. The Mitsubishi Electric PEA Splittable Series is specifically designed for this situation. The unit is compact enough to fit in tighter spaces, and the splittable design means each half can be manoeuvred through a standard ceiling access hatch without enlarging the opening.
If the cavity is extremely tight (under 250mm), a partial ducted solution may work - conditioning the main living areas via ducted with high-wall units in bedrooms. This hybrid approach keeps the clean look where it matters most while working within the building's constraints.
Multi-story homes
Two-story homes present unique challenges. The ground floor ceiling cavity is also the upper floor's floor space - there's no room for ductwork. Options include running ducts between the floor joists of the upper level to service ground floor rooms, using bulkheads to conceal duct runs, or installing separate systems for each level.
For two-story new builds, the solution is simpler - ductwork for each level is designed into the floor and ceiling structure from the start. Retrofit is where multi-story homes get complex and expensive, and sometimes a combination of ducted (upper level) and high-wall splits (ground floor) is the most practical answer.
Existing insulation
Ceiling insulation needs to be moved aside to run ductwork and position the indoor unit. A good installer puts it back properly once the ducts are in place - and makes sure insulation is not compressed or covering the ductwork in a way that restricts airflow. Poorly managed insulation during a ducted install can reduce both the system's performance and the home's thermal envelope.
If the existing insulation is old, thin, or degraded, the install is actually a good opportunity to upgrade it. The ceiling is being accessed anyway, and improved insulation means the ducted system works less hard - lower running costs and better comfort.
Long duct runs
In larger homes, some rooms are a long way from the indoor unit. Long duct runs lose more energy and deliver less airflow. The installer compensates by using larger diameter ducts for distant rooms, positioning the indoor unit as centrally as possible, and adjusting damper settings to push more air to far rooms. In very large homes, two separate ducted systems may be more efficient than one oversized system with extremely long runs.
Heritage and character homes
Waikato has plenty of older villas and bungalows where preserving original ceilings, cornices, and architraves matters. Ducted installs in these homes require extra care - grille positions need to complement the existing ceiling design rather than detract from it. Custom grille finishes, discreet placement, and careful cutting around ornamental plasterwork are all part of doing the job properly.
In some heritage homes, the ceiling is the limiting factor. If original decorative ceilings can't be cut into, alternative approaches like running ducts through a floor void or building discreet bulkheads along walls may be the better path.
Why we recommend the Mitsubishi Electric PEA Splittable Series
As an authorised Mitsubishi Electric installer, we fit the PEA Splittable Series across the majority of our ducted installations in the Waikato. The reasons are practical:
- Splittable design - the indoor unit separates into two halves, making retrofit installation through standard ceiling hatches straightforward without major ceiling modifications
- Compact dimensions- fits ceiling cavities as shallow as 270mm, opening up ducted as an option for homes that couldn't previously accommodate it
- Quiet operation - low sound levels from the indoor unit mean less noise transmission into the rooms below
- Inverter technology - the system modulates its output to match the actual demand, running at part-load most of the time for maximum efficiency
- Zone compatibility- works seamlessly with Mitsubishi Electric's zone controllers for independent temperature control across the home
- Proven in NZ conditions - designed and tested for New Zealand climate conditions including the cold, damp winters common across the Waikato
The PEA Splittable Series ranges from 5kW through to 14kW+, so there's a size for everything from a small 2-bedroom townhouse through to a large family home. For very large properties, we sometimes install two systems - one for each wing or level - which gives completely independent control and redundancy.
After the installation
Once commissioning is complete, there are a few things to know about living with a new ducted system:
- First 48 hours - run the system and walk through each room to check airflow and temperature. If anything feels off, call the installer while everything is fresh
- Filter maintenance - the return air filter needs cleaning every 3-6 months depending on usage. It slides out from the return air grille - the installer shows you how during handover
- Annual servicing - a professional service once a year keeps the system running efficiently. This includes cleaning the indoor coil, checking refrigerant charge, inspecting ductwork connections, and testing zone controls
- Warranty - Mitsubishi Electric systems come with a manufacturer warranty. As an authorised installer, we register the warranty on your behalf at commissioning
A well-installed and regularly serviced ducted system should last 15-20 years. The most common issue we see in older systems is ductwork degradation - flexible ducts can sag, connections can loosen, and insulation on the ducts can deteriorate. An annual service catches these issues early.
What affects installation cost
The price of a ducted installation varies significantly based on:
- New build vs retrofit - retrofit costs more due to the additional labour involved in working within an existing ceiling cavity
- Number of zones - each zone needs a motorised damper, temperature sensor, and wiring back to the controller
- System capacity - larger homes need bigger systems with more powerful indoor and outdoor units
- Duct run length - longer runs need more material and labour
- Access difficulty - tight ceiling cavities, multi-story homes, and complex roof structures add time and cost
- Grille type - standard rectangular grilles are cheaper than linear slot grilles or custom finishes
- Electrical work - if the switchboard needs upgrading or the dedicated circuit run is long, electrical costs increase
For a full breakdown of expected costs across different home sizes and configurations, see our ducted system cost guide.
Frequently asked questions
How long does a ducted heat pump installation take?
A new build ducted installation typically takes 2-3 days because ductwork is run before the ceiling goes in and access is unrestricted. Retrofitting into an existing home takes 3-5 days depending on ceiling cavity access, the number of zones, and whether any building modifications are needed to route ducts or position grilles.
Do I need to be home during the ducted system install?
You should be available on the first morning so the installer can walk through final grille positions and answer any last questions about zone layout. After that, you don't need to stay - but someone should be reachable by phone in case the team hits anything unexpected in the ceiling cavity or needs access to a locked room.
Can you install ducted in an existing home with low ceilings?
It depends on the ceiling cavity depth. The Mitsubishi Electric PEA Splittable Series only needs around 270mm of clearance, which suits many older NZ homes. If your cavity is tighter than that, a bulkhead or semi-ducted approach may work for part of the home. We assess this during the free site visit before quoting.
Will the installation damage my ceiling or walls?
Some ceiling access holes are necessary for running ductwork and positioning grilles, but a good installer plans cuts carefully and makes good with plaster and paint-ready finishes. In new builds there is no remediation needed because the work happens before lining. Retrofit installs typically require minor ceiling patching around grille cutouts.
What size ducted system do I need for my home?
System sizing is based on the total floor area being conditioned, insulation levels, window orientation, ceiling height, and how many zones you want. A 3-bedroom Waikato home typically needs a 10-14kW system. We calculate this during the site visit using Mitsubishi Electric's sizing software - never guess or go by floor area alone.
How disruptive is a retrofit ducted installation?
Expect 3-5 days of work with moderate disruption - ceiling access holes, some dust, and noise from drilling and cutting. The outdoor unit installation involves concrete pad work and pipe runs through an exterior wall. Most families stay in the home during the install. We lay drop sheets and clean up daily, but it is a construction job.